

Android Mavericks(MvRx) Architecture, Android on Autopilot: Getting Started
Reading Time: 5 minutesWhat is Mavericks architecture?
Mavericks is a framework built on top of Jetpack ViewModel. Usually, on ViewModel, we create LiveData and MutableLiveData inside ViewModel, and later on, we expose it to the fragment/activity. But In Mavericks, ViewModel will have only one immutable data class (Known as state class). So, now ViewModel will update only one data class, and it will render the UI. It’s based on Model-View-ViewModel architecture and is a Kotlin-first and Kotlin-only framework.
Mavericks is based on the concept of React. React is a popular web framework that helps build reactive apps.
In this tutorial, I’ll explain the core concepts of Mavericks, how to use them.
Why Mavericks(MvRx)?
Before going into detail, let’s see its advantage and whether it’s the right fit for your project.
Mavericks Offers
- State Management: The state of your app is a data class representing the app’s data properties. For example, In a news app could have news posts.
Mavericks makes state management very easy and flexible to use. - Easy Integration with Android Architecture components: It is built on top of the android architecture components, making it easy to use with the existing app, which already uses the android architecture component.
Core Concepts
To learn Mavericks, we need to understand only 3 classes: MavericksState, MavericksViewModel, and MavericksView.
MavericksState
In Mavericks, the first step is to create the state of your screen. After that, the MavericksState interface signals the intention of your class to be used as a state.
Modelling a screen using state is useful because it is
- Thread-safe
- Easy to read and understand by other developers
- Easy to test
In Mavericks architecture state should follow the following rules.
- The state must be a kotlin data class
- The state must have immutable properties
- All the properties of the state should have default values.
Derived Properties
Because the state is a Kotlin data class, we can create derived properties. For example
data class UserState(
    val fistName: String = "Jay",
    val lastName: String = "Poojara"
) : MavericksState {
    // Derived Properties.
    val fullName = "$fistName $lastName"
}
Creating derived property like fullName means:
- We can observe the changes of derived properties using onEach
- It will always be in sync with the state
- It makes code more readable
- It is straightforward to write the unit test cases
MavericksViewModel
MavericksViewModel is responsible only for two things
- Updating the state
- Expose the stream of states on which other classes can observe
MavericksView
MavericksView is a place where we actually render the data. It can be a fragment/activity. By implementing MavericksView:
- We can access the MavericksViewModel via any of the view model delegates. Doing so will automatically subscribe to changes and calls.
invalidate(). - Override the
invalidate()function.invalidate()is used to redraw the UI on each state change.
Mavericks also support Coroutines, dependency injection libraries like Dagger and Hilt, Jetpack compose, Jetpack Navigation etc.
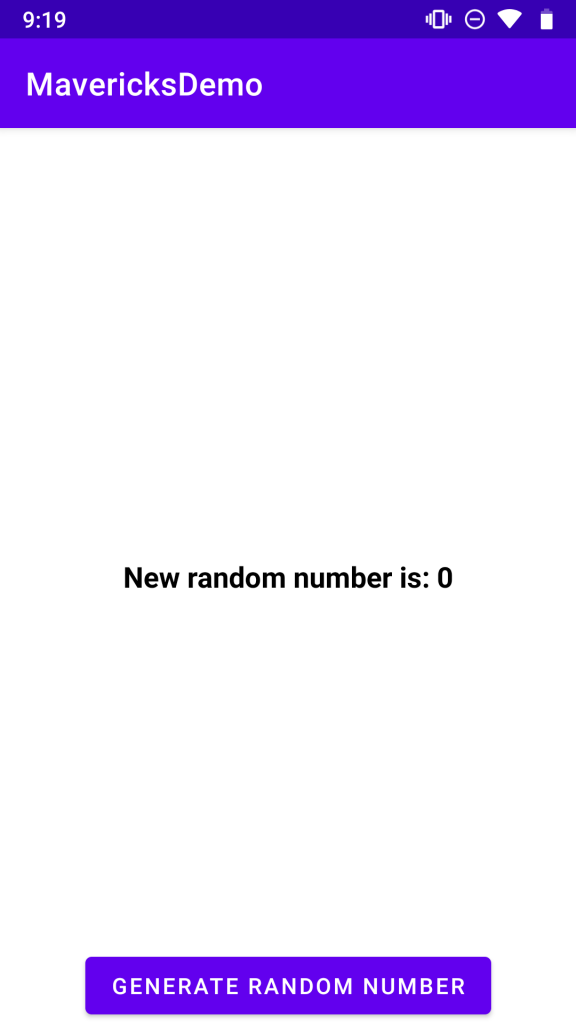
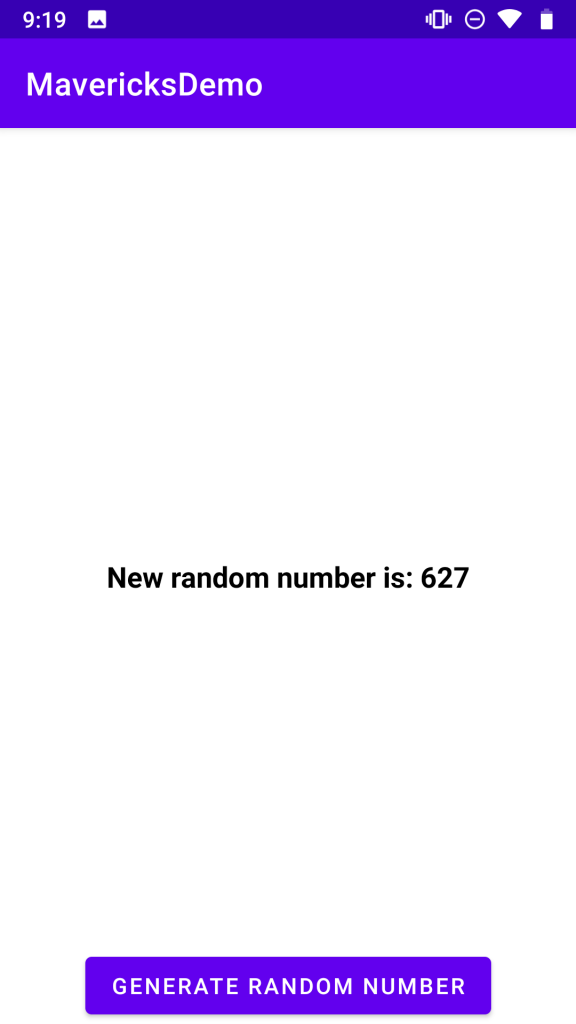
This tutorial will create a simple app that will generate a random number when the user clicks the button using Mavericks.
Step 1: Create a new project & setup required dependencies
For this project, we will need the following dependencies
dependencies {

    implementation "org.jetbrains.kotlin:kotlin-stdlib:$kotlin_version"
    implementation 'androidx.core:core-ktx:1.5.0'
    implementation 'androidx.appcompat:appcompat:1.3.0'
    implementation 'com.google.android.material:material:1.3.0'


    // Constraint Layout
    implementation 'androidx.constraintlayout:constraintlayout:2.0.4'

    // Fragment
    implementation "androidx.fragment:fragment-ktx:1.3.5"

    //mavericks
    implementation 'com.airbnb.android:mavericks:2.3.0'

    // Android Lifecycle
    implementation "androidx.lifecycle:lifecycle-livedata-ktx:$archLifecycleVersion"
    implementation "androidx.lifecycle:lifecycle-common-java8:$archLifecycleVersion"
    implementation "androidx.lifecycle:lifecycle-viewmodel-ktx:$archLifecycleVersion"
    implementation "androidx.lifecycle:lifecycle-runtime-ktx:$archLifecycleVersion"
    implementation 'androidx.legacy:legacy-support-v4:1.0.0'

    testImplementation 'junit:junit:4.13.2'
    androidTestImplementation 'androidx.test.ext:junit:1.1.2'
    androidTestImplementation 'androidx.test.espresso:espresso-core:3.3.0'
}
Step 2: Create application class and initialize Mavericks
I have created the MavericksDemo class and extended it with the Application class. If you do not initialize this class, then the app will throw java.lang.IllegalStateException.
package com.mavericks.demo

import android.app.Application
import com.airbnb.mvrx.Mavericks

class MavericksDemo: Application()  {
    override fun onCreate() {
        super.onCreate()
        Mavericks.initialize(this)
    }
}
After that, register the class to the AndroidManifest.xml file
<?xml version="1.0" encoding="utf-8"?>
<manifest xmlns:android="http://schemas.android.com/apk/res/android"
    package="com.mavericks.demo">

    <application
        android:name=".MavericksDemo"
        android:allowBackup="true"
        android:icon="@mipmap/ic_launcher"
        android:label="@string/app_name"
        android:roundIcon="@mipmap/ic_launcher_round"
        android:supportsRtl="true"
        android:theme="@style/Theme.MavericksDemo">
        <activity android:name=".activity.MainActivity">
            <intent-filter>
                <action android:name="android.intent.action.MAIN" />

                <category android:name="android.intent.category.LAUNCHER" />
            </intent-filter>
        </activity>
    </application>

</manifest>
Step 3: Create a state class
Now, let us create our first state class. State class will have all the properties which will help us to render the UI. Right now, we will need only one property called randomNumber.
package com.mavericks.demo.mavericks.vavericksstate

import com.airbnb.mvrx.MavericksState

data class RandomNumberState(
    val randomNumber: Int = 0
): MavericksState
Step 4: Create a ViewModel class
Now, this class will help us to modify/update the state.
package com.mavericks.demo.mavericks.viewmodel

import com.airbnb.mvrx.MavericksViewModel
import com.mavericks.demo.mavericks.vavericksstate.RandomNumberState
import kotlin.random.Random

class RandomNumberViewModel(initialState: RandomNumberState) :
    MavericksViewModel<RandomNumberState>(initialState = RandomNumberState()) {
    fun updateRandomNumber() {
        val randomNumber = Random.nextInt(0, 1000)
        setState { copy(randomNumber = randomNumber) }
    }

}
Here, We have created the method called updateRandomNumber. This method is responsible for generating the new random number and updating the state property called randomNumber.
As you can see here, we cannot mutate the state directly. Instead, we have to use the setState function to update the state, and the reason behind this is that by default state is immutable.
copy comes from the state class because the state is a Kotlin data class. Kotlin data class provides this function by default.
We can update any property of the state class using:
setState { copy(yourProperty = newValue) }
Step 5: Create a fragment and extend it using MavericksView
Here, we will create a fragment called RandomNumberFragment and will extend it using MavericksView. This fragment has one TextView and one Button.
package com.mavericks.demo.fragment

import android.os.Bundle
import android.view.LayoutInflater
import android.view.View
import android.view.ViewGroup
import androidx.fragment.app.Fragment
import com.airbnb.mvrx.MavericksView
import com.airbnb.mvrx.fragmentViewModel
import com.airbnb.mvrx.withState
import com.mavericks.demo.R
import com.mavericks.demo.databinding.FragmentRandomNumberBinding
import com.mavericks.demo.mavericks.viewmodel.RandomNumberViewModel


class RandomNumberFragment : Fragment(), MavericksView {
    private val binding by lazy { FragmentRandomNumberBinding.inflate(layoutInflater) }
    private val viewModel: RandomNumberViewModel by fragmentViewModel()
    override fun invalidate() {
    }

    override fun onCreateView(
        inflater: LayoutInflater, container: ViewGroup?,
        savedInstanceState: Bundle?
    ): View {
        return binding.root
    }

    override fun onViewCreated(view: View, savedInstanceState: Bundle?) {
        super.onViewCreated(view, savedInstanceState)
    }
}
Step 6: Observe the state and update the UI accordingly
Here, we will implement the state observer, and we will update the UI based on it. To do this, we will use a method called withState.
withState Accesses ViewModel state from a single ViewModel synchronously and returns the result of the block.
So, now invalidate() method will look something like this.
override fun invalidate(): Unit = withState(viewModel) {
    binding.textViewRandomNumber.text = getString(R.string.random_number, it.randomNumber)
}
So, our RandomNumberFragment will look something like this.
package com.mavericks.demo.fragment

import android.os.Bundle
import android.view.LayoutInflater
import android.view.View
import android.view.ViewGroup
import androidx.fragment.app.Fragment
import com.airbnb.mvrx.MavericksView
import com.airbnb.mvrx.fragmentViewModel
import com.airbnb.mvrx.withState
import com.mavericks.demo.R
import com.mavericks.demo.databinding.FragmentRandomNumberBinding
import com.mavericks.demo.mavericks.viewmodel.RandomNumberViewModel


class RandomNumberFragment : Fragment(), MavericksView {
    private val binding by lazy { FragmentRandomNumberBinding.inflate(layoutInflater) }
    private val viewModel: RandomNumberViewModel by fragmentViewModel()
    override fun invalidate(): Unit = withState(viewModel) {
        binding.textViewRandomNumber.text = getString(R.string.random_number, it.randomNumber)
    }

    override fun onCreateView(
        inflater: LayoutInflater, container: ViewGroup?,
        savedInstanceState: Bundle?
    ): View {
        return binding.root
    }

    override fun onViewCreated(view: View, savedInstanceState: Bundle?) {
        super.onViewCreated(view, savedInstanceState)
        binding.buttonGenerateRandomNumber.setOnClickListener {
            viewModel.updateRandomNumber()
        }
    }
}
Our final output will look something like this:
You can learn more about Mavericks from its official website https://airbnb.io/mavericks/#/. To know more about AirBnb’s motivation behind developing MvRx, you can watch this video on youtube – https://www.youtube.com/watch?v=Web4xPi2Ga4&t=731s.
Note: The codes presented in the work are available on the master branch of my Github account in the android-mavericks-architecture-demo repository. Feel free to browse through!