Beginners Guide To Setup React Native Application
Reading Time: 3 minutesAre you a newbie looking for developing an app using React Native? Or are you stuck while setting up React Native Application? Or are you looking for a step-wise React Native setup guide to help you during the process? If your answer to any of these questions is yes, then look no further! Here, you can find a comprehensive React Native app setup tutorial which will help you to successfully set-up a React Native environment on your system.
Prerequisites
The installation of the React Native development platform demands certain tools. A majority of them remain the same irrespective of the operating system. Here is a list of such prerequisite tools – common for both Windows and Mac OS.
- Node
- Watchman
- React Native command-line interface
- Xcode/Android Studio
Setting-Up React Native on MacOS
The following section presents you a step-by-step process to setup React Native on MacOS.
Step 1: Install Homebrew
To install this package manager,
- Open the terminal and use this command to install homebrew
/bin/bash -c "$(curl -fsSLhttps://raw.githubusercontent.com/Homebrew/install/master/install.sh)"Step 2: Install Node and Watchman
Make the JavaScript environment ‘debug-ready’ by installing recent versions of node and watchman.
- brew install node
- brew install watchman
Step 3: Install Xcode
- Install Xcode via the Mac App Store to compile iOS applications
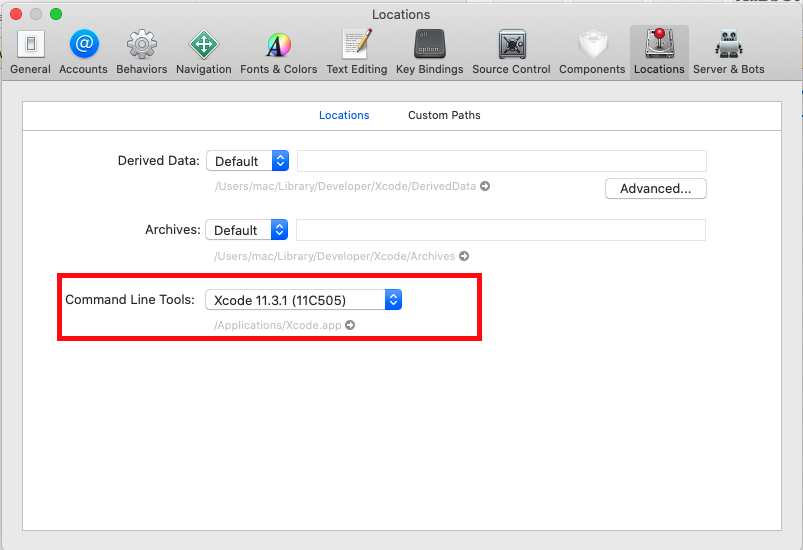
Step 4: Install Xcode command line tools
The next step would be to use Xcode to install command-line tools. To do this,
- Open Xcode
- Click on the “Preferences” tab in the Xcode menu
- Choose “Locations” from the panel
- Install the latest command-line tools
Step 5: Installing CocoaPods
Next would be to install CocoaPods to manage library dependencies of Xcode projects. This can be done using the command
sudo gem install cocoapodsStep 6: Install JDK
JDK version 8 can be installed by using the following commands
brew cask install adoptopenjdk8brew tap AdoptOpenJDK/openjdkStep 7: Setup Android development environment
In this step, we will install and configure Android Studio on a Mac Operating System.
- Install Android Studio
- Download it from https://developer.android.com/studio/index.html
- Choose a “Custom” setup when prompted to select an installation type.
- Make sure to check all the following boxes:
- Android SDK
- Android SDK platform
- Performance (Intel ® HAXM)
- Android Virtual Device
- Configure the ANDROID_HOME environment variable by adding the following lines to your $HOME/.bash_profile or $HOME/.bashrc configuration file.
export ANDROID_HOME=$HOME/Library/Android/sdk export PATH=$PATH:$ANDROID_HOME/emulator export PATH=$PATH:$ANDROID_HOME/tools export PATH=$PATH:$ANDROID_HOME/tools/bin export PATH=$PATH:$ANDROID_HOME/platform-tools
Step 8: Configure React Native command-line interface
Next, you can configure the command-line interface for React Native development platform by making use of
react-native-cli and npx react-native <command>
Step 9: Create a new application
That’s done! You have now successfully setup React Native on MacOS and have all that is necessary to build your first React Native project. Initialize by running the following command in your workspace
npx react-native initHelloWorldSetting-Up React Native on Windows
This section helps you to setup React Native on Windows operating system. At this point, it is worthwhile to mention that iOS applications cannot be built on the system working on Windows only. That is, the development of native code for iOS in Windows necessarily requires the support of Mac OS. So, this section introduces you to a few additional steps that must be followed in conjunction with those mentioned in the earlier section, “Setting-Up React Native on Mac OS”.
Step 1: Install Android Studio along with JDK
Android Studio can be downloaded and installed from the link https://developer.android.com/studio/index.html
Step 2: Configure ANDROID_HOME environment variables
To do this
- Open Windows Control Panel
- Select “System and Security”
- Open “System” pane
- Click on “Change Settings”
- Navigate to “Advanced” tab
- Click on “Environment Variables”
- Select “New”. This results in SDK installation at the default location
C:\Users\YOUR_USERNAME\AppData\Local\Android\Sdk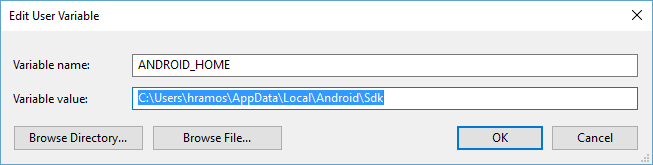
Step 3: Add platform-tools to Path
Next, you will have to add the necessary platform-tools to the Path variable. To accomplish this
- Open “System” pane under “System and Security” from the Windows Control Panel
- Click on “Change Settings” and navigate to “Advanced” tab
- Click on “Environment Variables”
- Select the Path variable and click on “Edit”
- Config “New” field to reflect the following line
C:\Users\YOUR_USERNAME\AppData\Local\Android\Sdk\platform-tools
The next steps would be the same as that you did while setting-up React Native on MacOS.
That’s it! Once you complete all these steps, you can start building iOS apps either on Mac OS or on Windows.